|
How to Successfully Calibrate Home Theater Audio Systems(Part 2 of 2 – 10 Steps to Optimized Sound) | ||||||||||||||
|
|
BY PAUL NIES, 21st Century Technologies | ||||||||||||||
|
"…a quality calibration job means more to good sound than any of the customer’s expensive components” Gerry Lemay, President Home Acoustic Alliance |
Part 1 of this two part article (Control Audio Distortions) stated two basic truths that are fundamental to a successful calibration 1) An audio system is not just electronics, and 2) The correct use of acoustic treatments and correct speaker placement must be based on sound measurements. The article discussed distortions that ruin home theater sound; spatial, tonal, and noise.
| ||||||||||||||
|
How to Successfully Calibrate Home Theater Audio Systems – part 1: Control Audio Distortions |
|||||||||||||||
|
In this second article we explain the logical, 10-step approach to calibrating a system, and we discuss the total calibration process and the tools needed to maximize your calibration success and achieve good customer satisfaction. The SP295 Audio measurement suite provides you with the tools that you need to successfully accomplish this task.
| |||||||||||||||
|
“... the room is the final audio component...any improvement is a tremendous asset to both loudspeaker manufacturers, and customers. Those people who know how to elicit good sound from loudspeakers in a room...are the ones who can truly serve their customers, by delivering something tangible: great sound.” Excerpt from MAXIMIZING LOUDSPEAKER PERFORMANCE IN ROOMS, Floyd Toole, VP Acoustical Engineering Harman International Industries, Inc.
|
Some of the distortion-causing factors in an audio system, such as ITDG and reflections, interact so adjusting one also affects the other. But other room characteristics, such as room modes and ITDG are unrelated and must be addressed separately. Here is a logical, 10-step approach to calibrating a system that guides you through resolving distortion problems in the most efficient manner.
1. Background NoiseAll home theater rooms have some background noise; such as HVAC or video projector fan noise, or other outside noises. If the ambient noise level is too high it will adversely affect the performance of the sound system. A Noise Criteria (NC) meas- |
urement will quickly tell you if the room has a problem with ambient noise. Select the SP295 Noise Criteria test and look for a reading of 25 or lower (15 for THX theaters). If the NC is higher than 25, use the limiting band frequency to guide you to the problem noise.
| |||||||||||||
|
| |||||||||||||||
|
SENCORE SP295 | |||||||||||||||
|
| |||||||||||||||
|
|
2. Initial Speaker Placement All 5.1 surround sound home theater systems have the same basic setup. Here are some good, basic guidelines to use as you begin placing the speakers within the room: Front L & R Main Speakers Form an equilateral triangle with the center of the listening area Locate at least 3 feet from walls Position about 1/4 of room width from side walls & 1/4 of room length from front wall Center Speaker Position as close to the video display as possible Position evenly with the front edge of the video display Position the tweeters of all 3 front speakers at ear height of a seated listener Surround Speakers Position direct radiating & dipole speakers on sides of listening area, 2-3 feet above the listener's head Aim direct-radiating speakers at each other, not at the listener If the room is too "live”, tilt direct-radiating speakers down slightly; too "dead” aim at rear wall or ceiling Subwoofer Can be placed out of sight or hidden if good location acoustically Place in front of listener to maintain mid & high frequency phase alignment Major interaction with room modes – see Step #7
|
| |||||||||||||
|
|
3. Check Speaker and Cable Integrity You’ve heard the old adage that a chain is only as strong as its weakest link. In an audio system, that link can commonly be the speakers or the cabling, so before you get too far into your calibration, you’ll want to confirm the expected operation of these often-overlooked components.
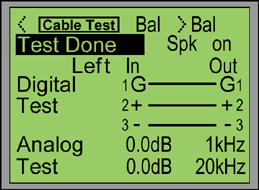
First, check the wiring integrity. The SP295 Cable Test checks both the pin out and frequency response of all types of audio cables. A good cable shows a straight through wire map, and has less than 1dB signal loss at 1 kHz and 20 kHz.
|
|
| ||||||||||||
|
SENCORE SP295 | |||||||||||||||
|
| |||||||||||||||
|
|
|
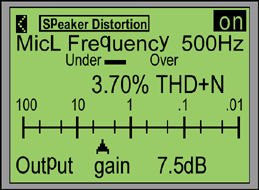
Next, make sure that none of the speakers are damaged and that they have similar performance. Do this using the SP295 Distortion Meter test. This test applies a test tone to the loudspeaker, via the system amplifier, and analyzes the speaker output for distortion. Good speakers should read less than 2%. The test is not intended to test to manufacturer’s specs, but it will quickly tell you if the speaker has a loose cone. Be sure to compare the distortion of all of the system speakers – they should be nearly identical.
|
| ||||||||||||
|
SENCORE SP295 | |||||||||||||||
|
|
|
| |||||||||||||
|
|
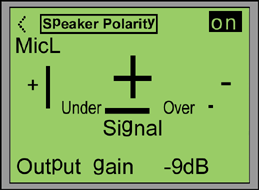
Finally test that all of the speakers are wired in phase. Proper driver phase is essential for good stereo imaging and proper frequency response. Some audio professionals listen for proper phase (do you have a calibrated ear?) or rely on the wire coding (ever had a speaker wired wrong internally?), but the best way to insure proper phase is with the SP295 Polarity test. To test speaker phase, connect the speakers to the amplifier, select the Polarity test, and feed the SP295 test signal into the amp. Position the SP295 microphone in front of each speaker and confirm that each reads “+”. Reverse the wiring for any speaker that reads “-“.
|
|
| ||||||||||||
|
SENCORE SP295 | |||||||||||||||
|
| |||||||||||||||
|
|
4. Time Delay Calibration
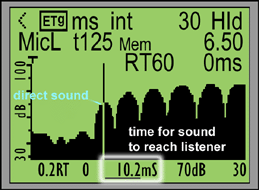
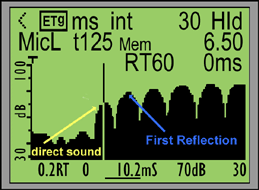
For a sound system to produce the correct sound field, the sounds from all speakers should arrive at the listener simultaneously. The time delay calibration on A/V processors adjusts the timing of the sound from the surround & center speakers so that it arrives at the center of the listening position at the same time as the front speaker sound. To accurately set time delay, measure the actual sound arrival time using the SP295 ETG function and adjust the receiver’s delay setting to make each speaker the same time. Because you are measuring the actual sound, your calibration accurately includes any audio system delays that would go undetected if you physically measured the speaker distance.
|
| |||||||||||||
|
| |||||||||||||||
|
|
|
The ETG measurements are made with the SP295 microphone located in the center of the listening area. The SP295 display shows a series of peaks. The first peak is the direct sound from the speaker. You can measure the time needed for this sound to reach the listening position using the measurement cursor. For complete instructions on setting processor delay time, click on this link: Using the SP295 to Set Speaker Delay /newsletter/May03/Delay1.html |
| ||||||||||||
|
SENCORE SP295 | |||||||||||||||
|
| |||||||||||||||
|
|
5. Speaker Level Balance
The sound level that each speaker produces at the center of the listening position should be the same. To calibrate speaker levels you will use the SP295 SPL measurement function. Select C-weighting and slow averaging. Set the SP295 generator for pink noise, and feed the signal in to the amplifier. Turn each speaker on individually, and set the level for 75 dB. (Use 85 dB for THX systems). After you have calibrated each channel for 75 dB, turn on all of the speakers and adjust the master volume control for 75 dB. Note this setting for the customer as the control setting that matches the typical program mix. |
|
| ||||||||||||
|
| |||||||||||||||
|
|
6. High Frequency Reflections and ITDG
Good sound in a home theater room depends on the right mix of reflected and direct sound energy – too little reflected sound energy and the room is cold and dead, too much reflected sound energy and the room echoes, has strong directional impressions, false stereo imaging, poor sound clarity, and a narrow soundstage. The key to the proper mix of high frequency reflections lies with the earliest reflections – those reaching the listener right after the direct sound. To control reflections, begin by placing an acoustical panel at the mirror points of each speaker. This allows the rest of wall to produce desired, low level reverberations. Our goal is to reduce the earliest reflections 10-12 dB below the direct sound. |
|
| ||||||||||||
|
| |||||||||||||||
|
SENCORE SP295 | |||||||||||||||
|
|
To know when you have reduced the reflected energy enough, but not too much, you need to measure the ITDG using the SP295 ETG function. The ETG display shows the strength of the direct sound and the levels of the reflected sounds that follow it. Apply the SP295 ETG test signal to each speaker, one at a time. All peaks that occur within 25-30 mSec of the direct sound should be reduced <10-12 dB below the direct sound level by using wall treatment at the mirror point. This will give you the proper ITDG for a home theater room. For complete instructions on working with high frequency reflections click on these Sencore News archive links: Acoustical Treatment for Early Reflections: /newsletter/Jan03/reflections.htm How to Determine If There Are Too Many Echoes in Your Listening Room: /newsletter/Mar02/SP295RDT.html |
| |||||||||||||
|
| |||||||||||||||
|
|
7. Bass Frequency Equalization
Smoothing out bass frequency response involves locating room modes and adjusting the position of the subwoofer or listening positions to avoid the worst modal effects, or perhaps adding a parametric equalizer to pull down the amplitude of an offending frequency. Room modes cause areas of greatly increased or decreased low frequency response throughout a home theater room. The SP295 suite provides three important tools that work together to help you successfully manage bass frequencies.
|
| |||||||||||||
|
|
|
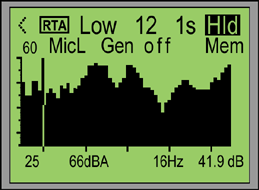
Real Time AnalyzerAn RTA visually displays the frequency spectrum so you can see dips and peaks. The SP295 RTA has superb 12th octave resolution and a special Low frequency range that zooms in on bass frequencies. Ideally you’d like a flat response, but with room modes you’ll have to settle for a little less. Keep in mind that peaks sound more offensive than suckouts, so work at smoothing the peaks. |
| ||||||||||||
|
SENCORE SP295 | |||||||||||||||
|
| |||||||||||||||
|
|
MX299 Mic MultiplexerThe MX299 multiplexes 4 microphone inputs to the SP295. The resulting RTA averages out the severe peaks and nulls of any single seating position, showing the average frequency response across all listening positions (spatial average). This allows you to instantly see the effects as you make changes to the room or to the equalizer. If you are working with just a few seating positions, put a measurement microphone in each position and use the MX299 to select between the mics. Using the MX299 you can instantly view the RTA at any of four microphone locations, or their spatial average. |
|
| ||||||||||||
|
| |||||||||||||||
|
|
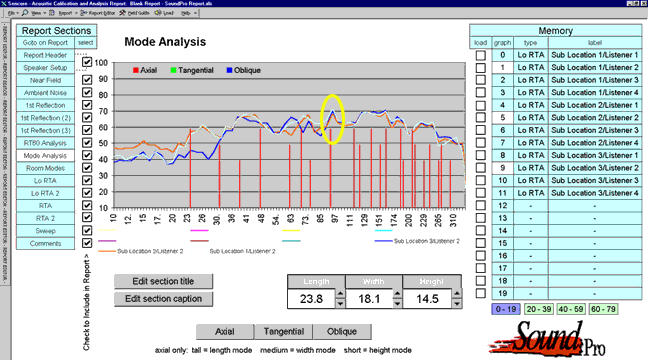
Calibration Report and Worksheet To determine the best subwoofer position/seating location/equalizer setting combination, compare the results of several different scenarios. The SP295 Report Software is especially helpful here with its Mode Analysis worksheet. After you make the RTA measurement for each different scenario, simply store the RTA data in one of the SP295’s memory locations and then download the data in to the worksheet. The worksheet graphically displays the RTA data so you can quickly visually compare the scenarios and choose the one that provides the smoothest bass response.
|
| |||||||||||||
|
|
|
| |||||||||||||
|
|
For complete instructions on managing bass response, click on these Sencore News archive links:Achieving a Flat Audio Response Quickly and Easily: /newsletter/Oct02/WhyMicMultiplexer.htmAchieving Flat Response In a Listening Room. Part 2 /newsletter/Dec02/Flat%20Response%20part2_files/Flat%20Response%20part2.htm Achieving Flat Response in a Home Theater, Part 3 /newsletter/Mar03/Flat%20Response%20part3_files/Flat%20Response%20part3.htm Using the SP295 SoundPro to Perform Bass Equalization /newsletter/Jan02/SP295bfe.html
|
| |||||||||||||
|
| |||||||||||||||
|
|
8. Subwoofer Crossover
A sign that you need to re-set the subwoofer crossover frequency is a dip or peak in the bass response between 80-100 Hz, no matter where you place the subwoofers or make the bass frequency RTA measurements. Many subwoofers have a crossover frequency adjustment, which sets the upper frequency response of the subwoofer. When this control is adjusted properly, the subwoofer begins to reproduce low frequencies that fall below the response of the main speakers, which provides a smooth response across the entire audio spectrum. If the frequencies reproduced by both the subwoofer and main speakers overlap too much, you will have “boomy" bass; if the crossover is too far apart, you’ll have a “hole" in the bass response somewhere around 80-120 Hz. Using the SoundPro to Perform Subwoofer Setup and the Crossover /newsletter/Jan02/SP295bfe.html
|
| |||||||||||||
|
| |||||||||||||||
|
|
9. Bass Frequency Sweep
Many of the smaller objects in a home theater room, such as pictures, items on shelves and even the A/V equipment in racks or speakers that are not properly mounted, can physically vibrate when they are excited by the right bass frequency. Usually, you can fix the vibration by easily adding felt pad tightening screws, or repositioning the offending object, once you know which object(s) is a problem. Very seldom, however, will the pink noise (used to make other acoustic tests) uncover the problem. Instead, you will need to apply a low frequency sweep to the room. You can easily do this using the SP295’s frequency generator function. First, connect the SP295’s output to the audio system and set the system to produce sound from all speakers, including the sub. Then, select the sine wave function. Start at 11 Hz and slowly increase the frequency to 400 Hz while listening for anything inside the room that vibrates at high volume level (about 75 dBSPL). If you are using the contractor software version of the SP295 you can use the sine wave sweep function to automatically produce the low frequency sweep. |
|
| ||||||||||||
|
| |||||||||||||||
|
|
10. Provide your customer with a Sound System Performance Report
The final step in any successful calibration is to document both the before and after calibration measurements. Generating a SoundPro ‘Acoustic Calibration and Analysis Report’ after each calibration accomplishes several important things:
1) It shows your customer that you have skillfully maximized the system’s performance and that you take pride and ownership in the job you have done.
2) It provides your customer with documented and techy “bragging rights” to the performance of his system.
3) It provides both you and your customer with documentation of how the system was setup, just in case some of the system controls or components get altered.
4) It’s a tool that helps you turn your technical calibration skills into business profits by generating new and repeat business at no extra cost to you.
|
| |||||||||||||
|
|
|
| |||||||||||||
|
|
For more information on using the Calibration Report to generate revenue, click on this Sencore News archive link: Use the Acoustic Calibration Report to Generate Revenue for Your Business
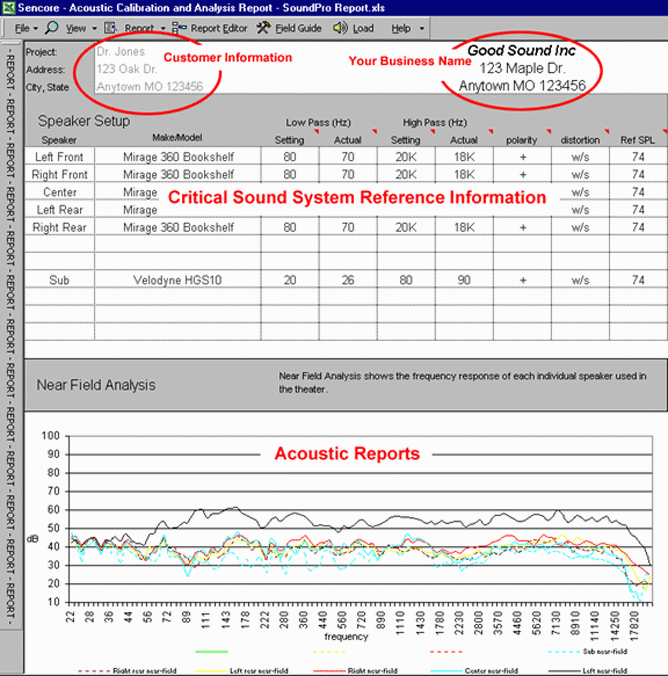
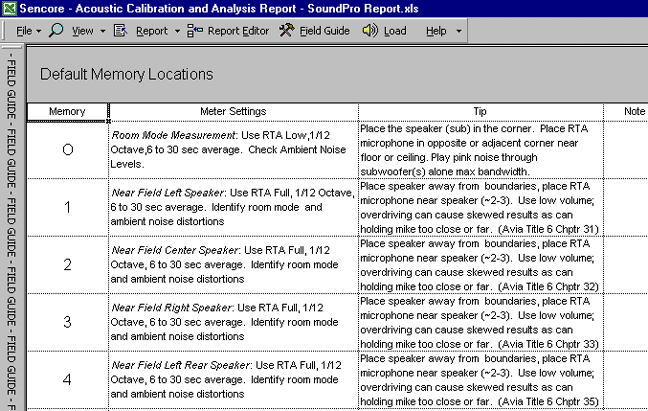
Collecting the sound analysis data from the SP295 and generating the ‘Acoustic Calibration and Analysis Report’ is straightforward - the included ‘Field Guide’ section of the report software walks you through the process of gathering system information and acoustic data. Once you’ve collected the data with the SP295, you download it to a computer. The software automatically generates the reports that you select – print them out and give them to your customer.
The SoundPro ‘Acoustic Calibration and Analysis Report’ is also an important tool for you to use during the system calibration process. First, the Field Guide section provides a quick reference for how to make each of the acoustic measurements, including SP295 settings, test signal, microphone location and other tips. This insures that you make each measurement correctly. The Field Guide also allows you to calculate the potential frequencies and locations of room modes so you can relate your measurements to the suspected problem spots. Finally, the Field Guide section allows you to keep track of component control settings and resonant objects. All of the information you enter is ready to include in the final reports.
|
| |||||||||||||
|
|
|
| |||||||||||||
|
| |||||||||||||||
|
To properly calibrate a home theater audio system · Control audio distortions · Follow a logical 10-step calibration approach · Use the proper measurement tools |
To properly calibrate a home theater audio system you need to control the audio distortions that alter the reproduced sound. Successful calibration can be accomplished by following a logical 10 step approach and using the proper measurement tools. The SP295 Audio measurement suite provides you with the tools that you need to successfully accomplish this task: - The SP295 provides the acoustic measurements and tests that identify and resolve acoustic problems
- The MX299 Mic mixer couples several measurement microphones to the SP295’s input to allow fast measurements at distributed locations throughout the room /products/cp5000/MX299 Cut Sheet.pdf
- The SP295 Report Software and Worksheets allow you to quickly analyze multiple room scenarios, and provide you customer with before and after documentation
| ||||||||||||||
|
| |||||||||||||||
|
|
For more information on how to successfully calibrate home theater sound systems, or to learn more about the SP295 Audio suite, call 1-800-SEN-CORE, or click this link: /forms/sp295pricing.asp. |
| |||||||||||||
|
|
|
| |||||||||||||
|
|
Paul Nies has been associated with Sencore for over 23 years in various capacities, including Application Engineer, Technical Trainer, and Multimedia Producer. Paul conducts numerous seminars on home theater audio and video for Sencore, including the CEDIA regional classes. He also provides application engineering and training support for Sencore’s video and audio products. |
| |||||||||||||
|
|
|
| |||||||||||||
|
|
1.800.736.2673 |
| |||||||||||||